DIY Hydroponic Veggies at Home: The Foolproof Guide
Want to transform household trash into a thriving hydroponic garden? Growing veggies without soil is simpler than you think! With everyday items and our step-by-step walkthrough, you'll witness seeds sprout into harvest-ready crops. Let's dive in.
I. Materials: Repurpose Household "Trash"
Skip expensive kits – raid your kitchen and balcony instead:
-
Containers: Plastic bottles (1.5L soda/water bottles), takeout containers (lidded ones preferred), foam boxes, or cleaned yogurt tubs (remove labels!).
-
Plant Support: Sponge cubes (cut from dish sponges), cotton balls, or newspaper strips to anchor roots while allowing water contact.
-
Nutrient Solution: Beginners: Buy all-purpose hydroponic nutrients (online/garden stores). DIY option: Use cooled water from boiled eggs (mineral-rich) or fermented rice-wash water (dilute 1:10 after 1-week fermentation).
-
Tools: Scissors, drinking straws (optional aeration), spray bottle.

II. Beginner-Friendly Plants
Start with these low-effort, fast-growing varieties:
-
Lettuce: Harvest in 3-4 weeks; pick outer leaves continuously.
-
Sprouts: Mung/soy beans – ready in 3-5 days using just water.
-
Green Onions: Regrow from white root ends – perpetual harvest!
-
Mint/Basil: Thrives in water; perfect for drinks & salads.
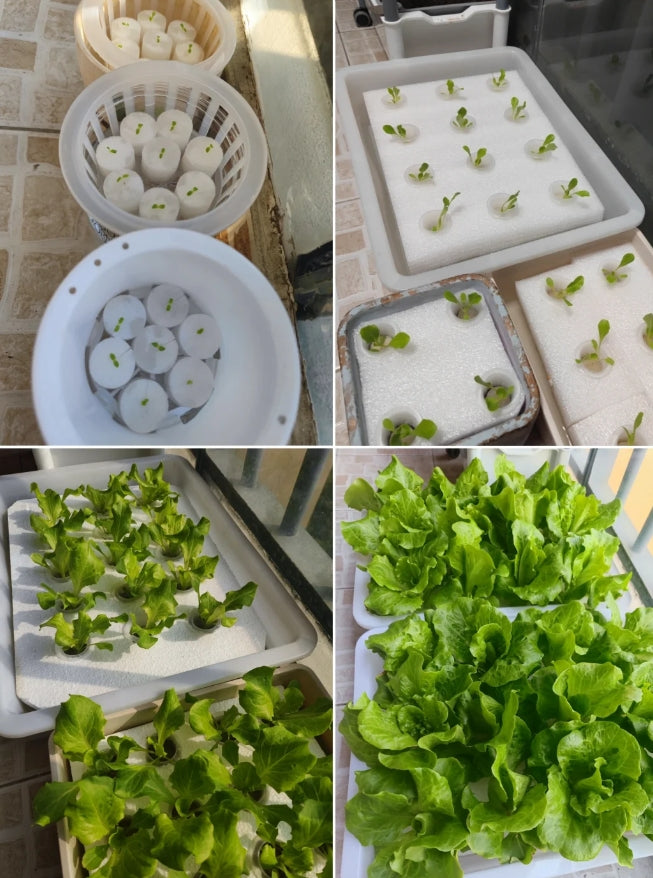
III. Step-by-Step: Lettuce Demo
1. Container Prep (5 mins)
Cut a 1.5L bottle horizontally. Use bottom half as reservoir (fill 1/2 with water). Remove bottle cap from top half, cut 2-3cm side holes for seedlings. For foam boxes, poke holes in lid (10cm spacing).
2. Germination
In a tray, spread seeds on damp paper towels/cotton. Cover lightly, mist daily, place near a window. Transplant when sprouts show 2 leaves (~3-5 days).
Pro tip for herbs: Place 5cm green onion roots or 10cm mint stems (lower leaves removed) directly in water. Roots emerge in 3-7 days.
3. Planting
Wrap seedling roots loosely in sponge cubes. Insert into container holes, ensuring roots graze water surface (leaves above water). Trim long roots to prevent full submersion – they need air!
4. Feeding
Add diluted nutrients (follow instructions; weaker solutions safer for starters). Maintain water level at 1/2-2/3 root height. Refresh solution every 3 days. Note: Onions/sprouts need only water.
5. Care Routine
-
Light: 4-6 hrs daily (windowsill ideal). Supplement with desk lamps if needed.
-
Temp: Keep at 15-25°C (59-77°F). Avoid direct AC/heater blasts.
-
Harvesting: Snip outer lettuce leaves at 15cm height; center keeps growing!

IV. Troubleshooting Guide
⚠️ Root Rot Risk: Roots need half water/half air exposure. Add aerating straws (poke holes in submerged ends).
⚠️ Nutrient Burn: Yellow leaves signal overdose. Start at 50% recommended strength.
⚠️ Stagnant Water: Change water every 2 days (summer) or 5 days (winter). Rinse slimy roots during changes.
V. Harvest Joy: Garden-to-Table Freshness
In 30 days, enjoy homegrown lettuce in salads or sandwiches – that crisp, clean taste is unforgettable! Herbs offer endless pick-and-use convenience. The pride of eating what you grew, pesticide-free? Priceless.
Golden Rule: Hydroponic success = Hydrated + Nourished + Oxygenated Roots. Master this trifecta, and even first-timers win. Grab a plastic bottle and launch your soil-free adventure today!
Our intelligent hydroponic planting box is suitable for various hydroponic planting scenarios, including hydroponic planting greenhouses, home hydroponic planting, agricultural hydroponic planting, etc. Whether you are a beginner or an experienced hydroponic enthusiast, we have the right solution for you.www.vvcultivate.com